All of us hate it when a Mac begins degrading with time. Everytime you attempt to save a file, it flashes an error message — your reminiscence is full!
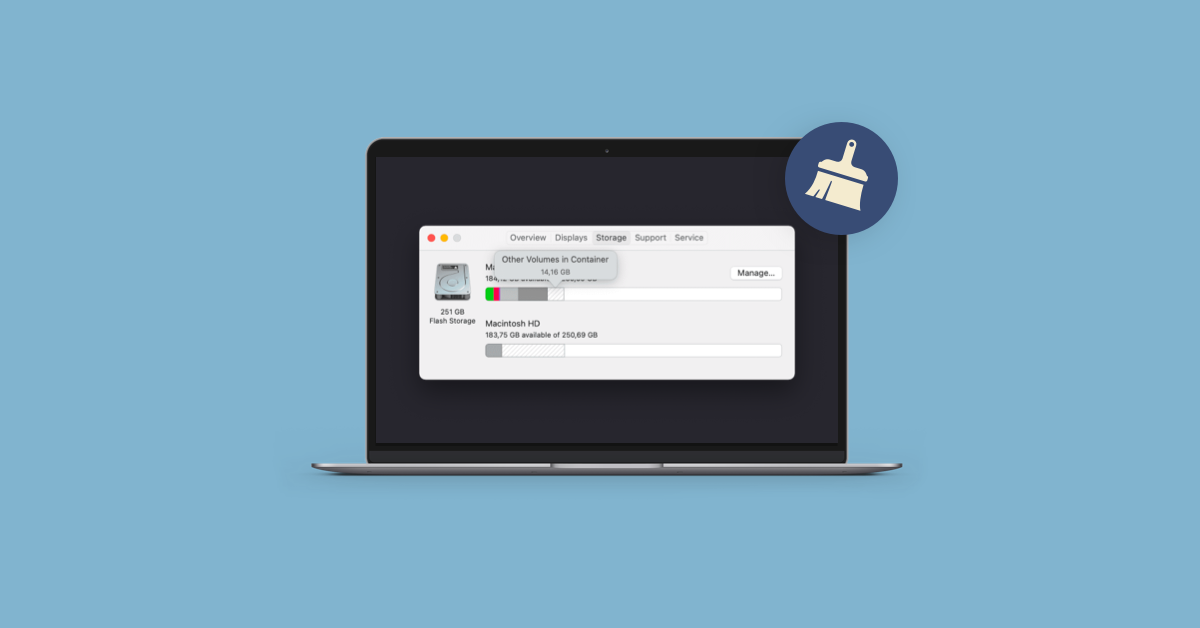
I’m positive you have to have tried peeking into your system to see what’s hogging up all of the reminiscence and are available throughout the mysterious “Different Volumes in Container.” What does it even imply?
I will prevent hours of head-scratching and clarify precisely what these different volumes in container in Mac are and methods to deal with them like a professional.
Easy steps to handle different volumes effortlessly
Earlier than diving into the strategies one after the other, right here’s a helpful desk that summarizes all of the steps for you:
| Find out how to handle different volumes | Find out how to do it |
|---|---|
| Create a brand new person account | Go to System Settings > Customers & Teams > Add Consumer. |
| Disable content material caching | Go to System Settings > Basic > Sharing > Flip off Content material Caching. |
| Delete pointless information | Use Gemini to search out duplicates and take away them with one click on. |
| Delete an additional quantity from a Mac container | Open Disk Utility > Click on View > Present All Gadgets > Proper-click and click on Delete APFS Quantity. |
| Discover and take away questionable applications | Open Finder > Functions. Proper-click > Click on Transfer to Trash. Alternatively, use CleanMyMac’s Uninstaller characteristic to take away all app’s information. |
| Run First Assist in Disk Utility | Open Finder > Functions > Utility > Disk Utility. Click on View > Present All Gadgets. Proper-click in your essential drive (Macintosh HD) > Click on First Assist. |
| Clear the system storage | Set up and open CleanMyMac > Click on Cleanup > Scan > Assessment the scan outcomes > Click on Clear. |
| Erase and reinstall macOS (Final resort) | Put your Mac into restoration mode. Open Disk Utility > View > Present All Gadgets > Select the principle drive (Macintosh HD) > Erase. |
| View and handle every quantity in a Mac container utilizing Terminal | Run diskutil listing > Test quantity sizes > Unmount the quantity by typing sudo diskutil unmount |
What’s different volumes in container?
In Mac, different volumes in container seek advice from system-managed APFS volumes that dynamically share storage. These embrace:
- Preboot: Helps macOS begin up
- Restoration: Shops macOS restoration instruments
- VM (Digital Reminiscence): Manages swap information when RAM is low
These are important and often don’t require motion. Nevertheless, in the event that they take up an excessive amount of area, checking for pointless partitions or system mismanagement may assist.
Find out how to take away different volumes within the container?
So now, with all of the fundamentals out of the best way, it’s time to be taught how one can reclaim treasured disk area for your self.
Create a brand new person account
Typically, glitches trigger different volumes in container in Mac to take extreme area. Utilizing the identical person account over a protracted time period begins including up all these glitches till, sooner or later, you’re looking at an enormous pile of unresolved points you by no means took the time to undergo. And now it’s too late.
To create a brand new person account to assist reset issues:
- Go to the Apple menu > System Settings > Customers & Teams.
- Click on Add Consumer.
- Fill in all the mandatory particulars.
- Enter the outdated system password (In case your system prompts it).
- Log in to the brand new account > Set it because the administrator.
- Test if the opposite volumes in container dimension has decreased.

This could eliminate all of the outdated configuration information and different pointless junk that has been holding your Mac again.
Disable content material caching
Content material caching shops updates and iCloud information for different gadgets, which might eat up area.
To repair it:
- Go to the Apple menu > System Settings > Basic > Sharing.
- Flip off Content material Caching.
- Discover and clear all of the pre-existing cache.
- Restart your Mac and examine the storage once more.

Caching is a luxurious that is useful when you could have loads of free area. However when your machine is being suffocated with ineffective junk? Not a lot.
Delete any pointless information utilizing Gemini
In case your system is piling up with a whole lot of pointless information, your Mac volumes can shortly overfill. It used to take me hours to manually acknowledge each duplicated file on my Mac, till I discovered Gemini. This device can scan your system and listing all of the pointless information in your assessment, and delete them with only one click on.
Right here’s methods to use it:
- Set up and open the Gemini app.
- Click on the massive add “+” icon.
- Choose which folders or sections you need to examine for duplicates.
- Click on Select > Scan for Duplicates.
- Click on Sensible Cleanup. This may clear all duplicate information in your system.

Delete an additional quantity from a Mac container
The Mac has its personal volumes, after which there are those we create as customers. Typically, we create a quantity, use it for a bit, after which completely neglect about it prefer it doesn’t even exist. However the machine? It remembers. With time, these volumes begin consuming up area and making your Mac gradual.
For those who’ve recognized a disused quantity, right here’s methods to delete Different Volumes in Container in Mac utilizing Disk Utility:
- Open Finder > Functions > Utilities > Disk Utility.
- Click on View within the menu bar > Present All Gadgets. The listing of volumes will probably be seen on the left aspect.
- Proper-click on the quantity you need to delete and click on Delete APFS Quantity.
- Affirm the deletion.

With these volumes gone, your machine will breathe slightly simpler.
Discover and take away questionable applications
All of us love making an attempt out new apps. A few of them turn into helpful, however a few of them — let’s be sincere — may be malware. Rogue or poorly coded apps can hog area, dissipate all of your RAM, and make your Mac as gradual as a turtle.
To delete them:
- Open Finder > Functions.
- Proper-click on the app you need to delete > Click on Transfer to Trash.
- Proper-click on the Trash icon > Click on Empty Trash.

Earlier than putting in any app, correctly background-check it to make sure it won’t hurt your machine.
Run First Assist in Disk Utility
After saving and deleting a number of information time and again, your Mac fills up with corrupted information. This information can inflate the opposite volumes within the container in Mac.
Use First Assist to repair it:
- Open Finder > Functions > Utility > Disk Utility.
- Click on View > Present All Gadgets.
- Proper-click in your essential drive (Macintosh HD) > Select First Assist.
- Click on Run and watch for the scan to finish.

This may assist spot any issues along with your exhausting drive and repair them immediately. Simply be affected person as a result of it’d take a short time, and take a look at to not mess with it whereas it’s working.
Clear the system utilizing CleanMyMac
For those who nonetheless discover it troublesome to delete different volumes, CleanMyMac generally is a helpful device. It enables you to discover pointless or legacy information taking on SSD area and purge all of them with the straightforward click on of a button.
Additionally, the app can velocity up your Mac prefer it was purchased simply yesterday, stave off any malware threats, and discover duplicate information which have stayed too lengthy in your machine.
To wash the system:
- Set up and open the CleanMyMac app.
- Go to the app dashboard and click on Cleanup > Scan.
- Click on Assessment within the System Junk window or just click on Clear.

Final resort: erase and reinstall macOS
If all else fails, a clear set up may be obligatory. However earlier than you do, make certain to again up your Mac. I’m fairly positive you wouldn’t need to see your whole exhausting work evaporate with out a hint (until that’s what you’re going for). Right here’s methods to erase and reinstall macOS.
For Apple silicon Macs:
- Shut down your Mac.
- Maintain the facility button till you see the Loading Startup Choices display.
- Click on Choices > Proceed to enter macOS Restoration.
For Intel-based Macs:
- Shut down your machine > then flip it on.
- Instantly press Command + R and maintain till you see the Apple brand or spinning globe.
Following the directions will put your Mac in restoration mode. After this, observe the beneath directions to erase and reinstall macOS:
- In macOS Utilities, open Disk Utility.
- Click on View > Present All Gadgets.
- Select the principle drive (Macintosh HD) > Click on Erase from the highest toolbar.
- Set Format to APFS and set Scheme to GUID > Erase. Watch for the method to finish.
- Return to macOS Utilities and click on Reinstall macOS > Proceed. Set the set up location to Macintosh HD.
- Watch for macOS to obtain and set up.
Once more, I need to emphasize that this course of is everlasting and can’t be reversed, so you ought to be sure that each one the opposite choices aren’t working.
Bonus tip: Backup your Mac information securely
Earlier than deleting different volumes or resetting your Mac, I strongly suggest that you simply again up your delicate information first. Among the finest methods to do that is thru Get Backup Professional.
The method is a straightforward one:
- Set up and open the Get Backup Professional app.
- Click on the “+” button on the backside so as to add a challenge.
- Fill in your challenge particulars and click on OK.
- Add information and folders to the backup utilizing the File+ button or drag and drop them.
- Choose a supply quantity that wants backup and a vacation spot quantity the place the backup will probably be saved.
- A dialogue field will seem; select whenever you need the backup to start out.
- Click on Begin.

You possibly can even schedule common backups in order that nothing is ever misplaced once more.
Find out how to view and handle every quantity in a Mac container utilizing Terminal?
In case you are tech-savvy, you’ll be able to even listing all of the volumes utilizing the Terminal — you’ll be able to mainly function your pc with only a keyboard and a terminal window (if you know the way).
To examine all of the volumes and the area they occupy:
- Go to Finder > Functions > Utilities > Terminal.
- Kind diskutil listing. This may listing all volumes and their particulars.
- Test their sizes and resolve if you wish to eliminate different volumes in container.
- Unmount the quantity by typing sudo diskutil unmount
. Exchange with the precise quantity identifier you need to unmount. - Delete the quantity by typing sudo diskutil apfs deleteVolume
. Once more, exchange with the quantity’s identifier. - The Terminal will ask for affirmation. Kind Y after which press Return.

Going past different volumes in container
Different Volumes in container in Mac is not at all times an issue, however when it’s, it is often as a consequence of pointless system information, rogue apps, or further volumes. These volumes aren’t bugs stealing your area — they’re integral components of a complicated storage system that is truly far superior to the outdated methods when you perceive the way it works.
If you end up overwhelmed when coping with these volumes, I’d suggest you check out apps by Setapp. For energy Mac customers, Setapp gives a extremely helpful suite of apps that may take your machine to the following stage. All of the apps, like CleanMyMac, Disk Drill, Gemini, and Get Backup Professional, will be discovered beneath a single subscription. However you may as well use them on a 7-day trial earlier than you commit absolutely.
FAQs
Why is my Mac storage filled with “Different Volumes”?
Your Mac is stuffed with Different Volumes as a result of it wants these volumes for correct functioning. These volumes might embrace:
- System information (like restoration partitions, snapshots, and digital reminiscence)
- Caches (momentary information that apps and macOS use to hurry issues up)
- Miscellaneous information (logs, plugins, and different bits that don’t belong elsewhere)
Can I clear APFS containers on my Mac?
You possibly can clear APFS containers. Nevertheless, you ought to be extraordinarily cautious; deleting an APFS container wipes out every thing inside, together with volumes, snapshots, and all related information. Use Get Backup Professional to again up your information first.
Can I delete Different Volumes inside a container on my Mac?
You possibly can delete Different Volumes by Disk Utility. Earlier than deleting, just remember to don’t have something necessary saved in that quantity, and again up your information with Get Backup Professional.
To delete volumes by Disk Utility:
- Open Finder > Functions > Utilities > Disk Utility.
- Click on View > Present All Gadgets.
- Proper-click on the quantity you need to delete and click on Delete APFS Quantity.
- Affirm the deletion.
Find out how to liberate area on Mac?
To liberate area in your Mac, use CleanMyMac to search out system caches and duplicate information and clear them with only one click on.